WooCommerce
With the WooCommerce plugin it is possible to make all parcel shipping options that are activated within your Boekuwzending.com account available to the webshop visitor.
Installation
This manual describes the possibilities of the Boekuwzending for WooCommerce plugin and how you can install the plugin in your WooCommerce webshop. We recommend that you always perform the installation on a test environment first. The installation of the plugin can be done in two ways:
From the WordPress plugin directory
To install the plugin from the WordPress plugin directory, follow the steps below:
- In WordPress, go to the
Plugins>Add Newmenu. - Type "Boekuwzending" in the search bar and press
Enter. - Choose the plugin Boekuwzending for WooCommerce and click
Install Now. The plugin will now be downloaded and installed. - When the download is complete, click
Activate.
Manually Upload the plugin
- Download the zip file of the plugin from the WordPress website
- In WordPress, go to the
Plugins>Add Newmenu. - Click
Upload Pluginat the top of the screen. - Choose the file you (just) downloaded and click
Install Now. - When the installation is complete, click
Activate.
Configuration
In WordPress go to WooCommerce > Settings > Boekuwzending to configure the plugin.
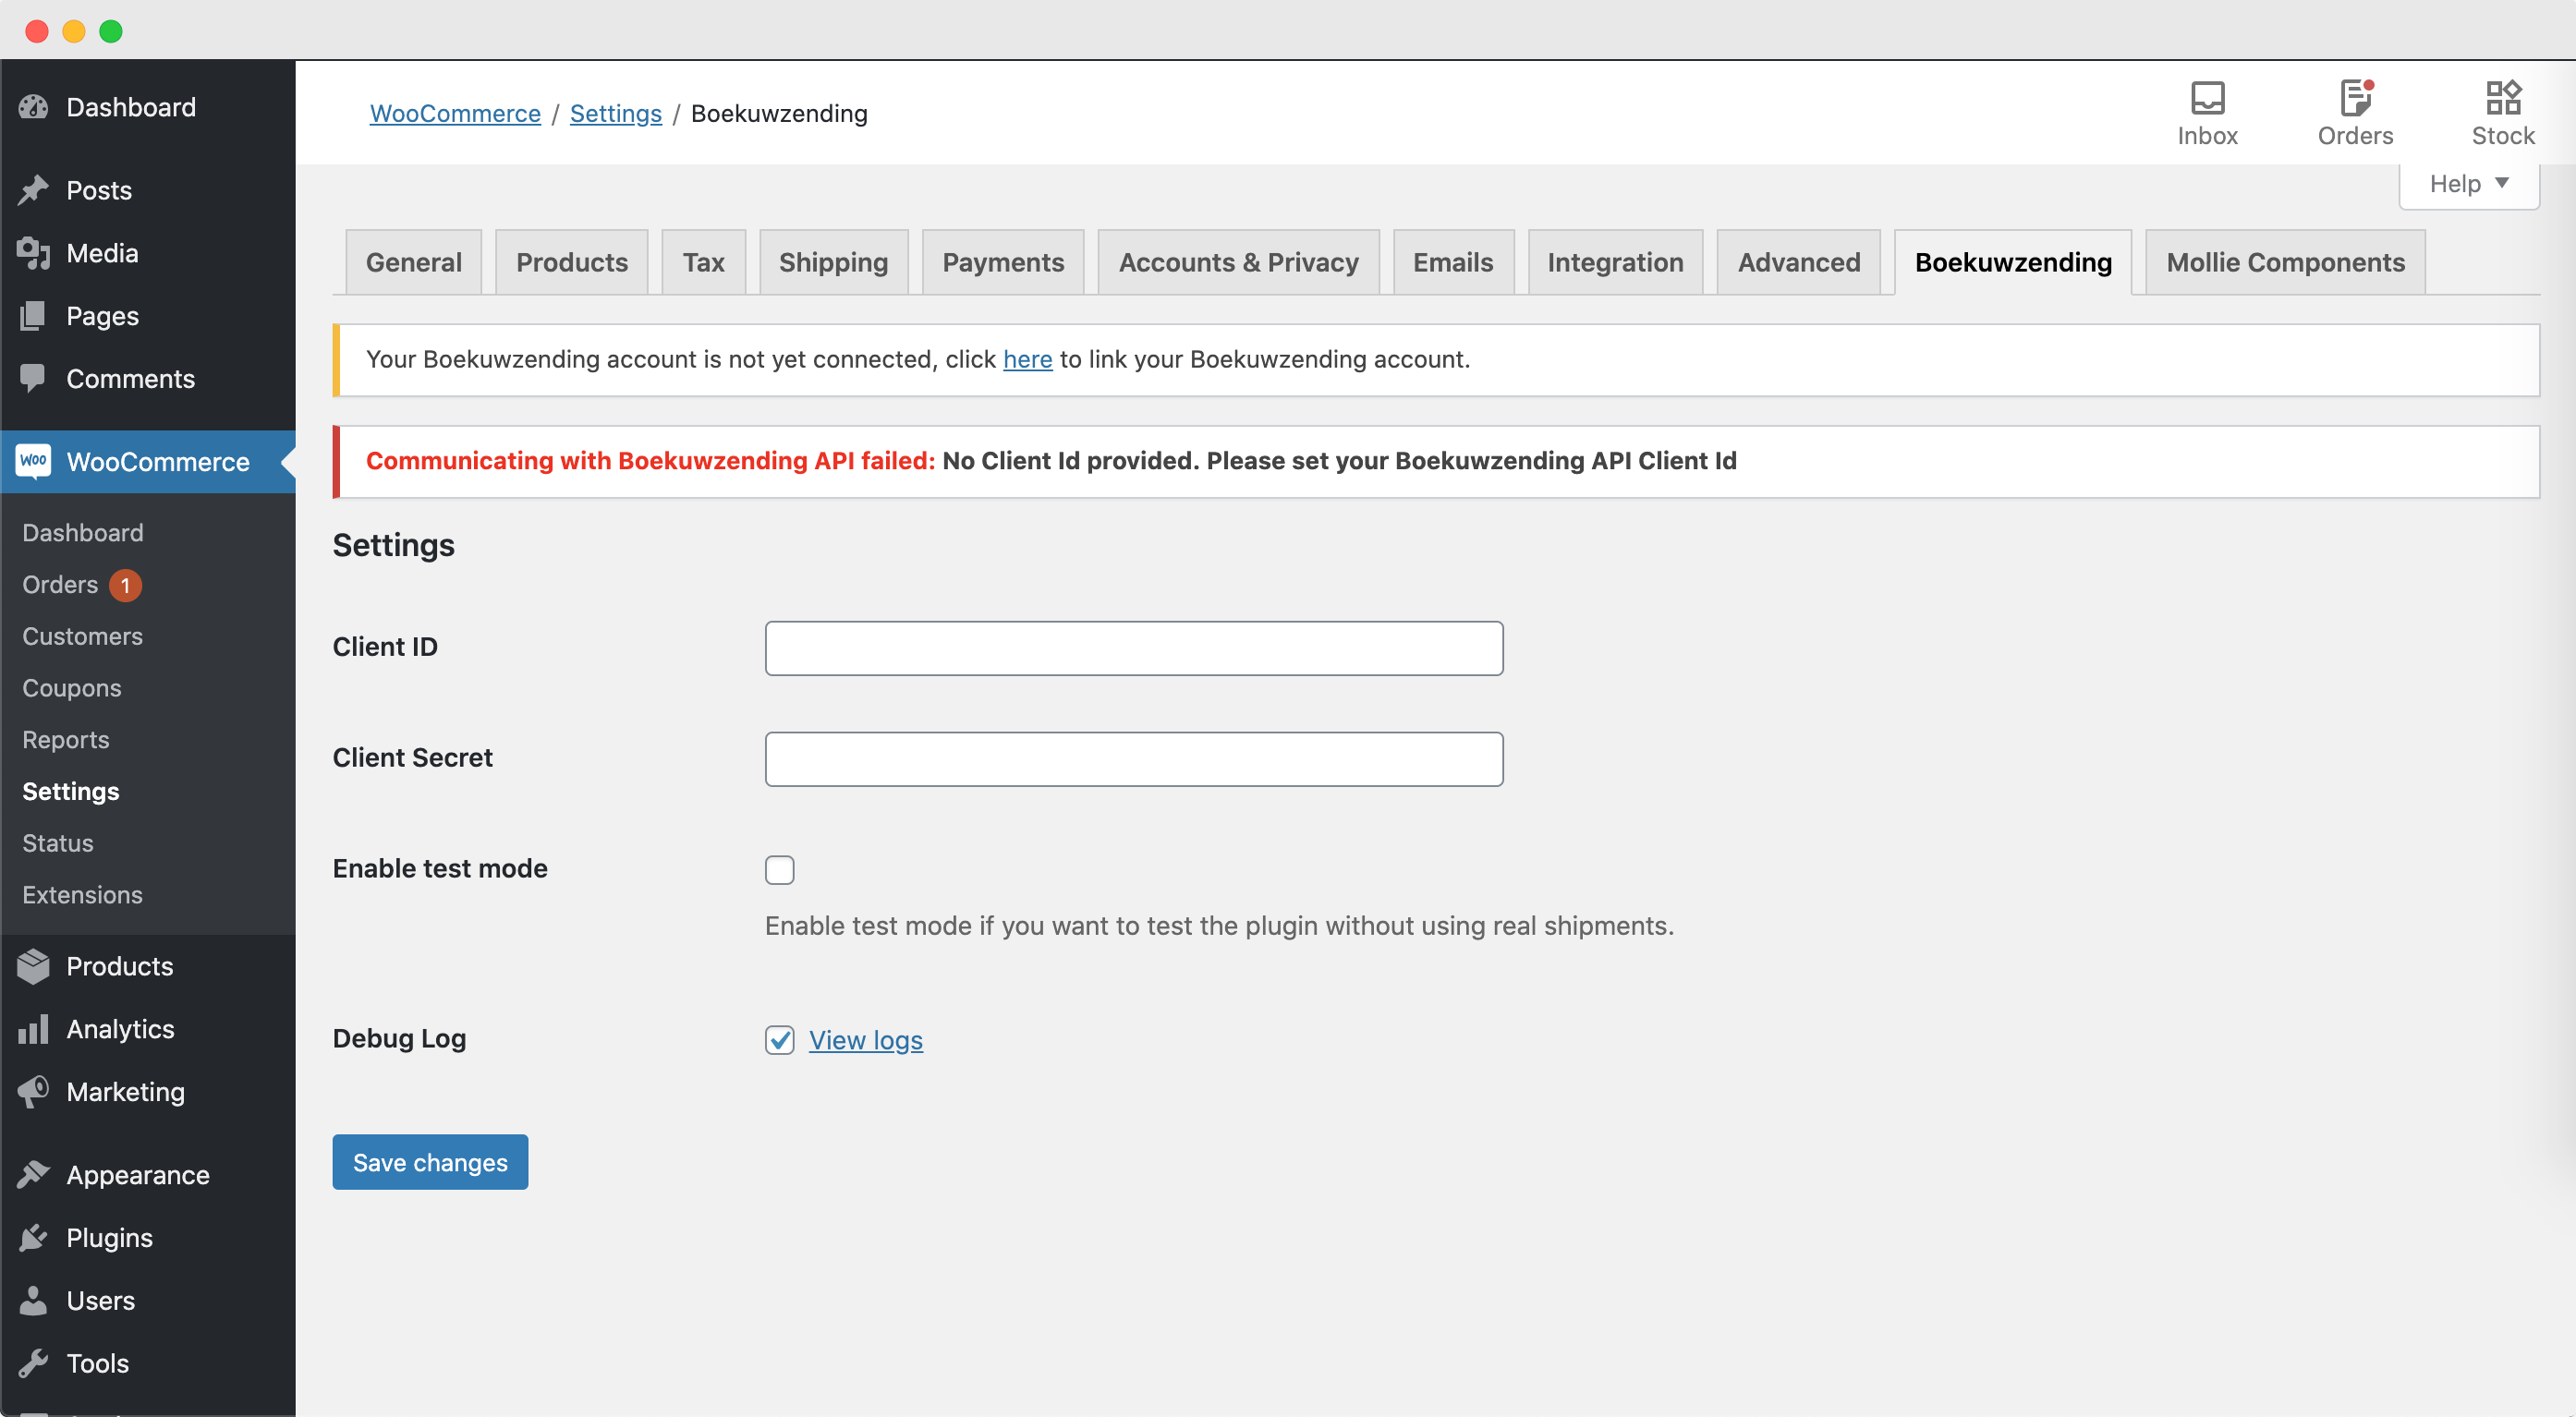
Link your account
It is possible to walkthrough an automatic linking process for your WooCommerce webshop and mijn.boekuwzending.com account. In order to start the process click on the link highlighted in the following image.

After clicking on the link you will be redirected to mijn.boekuwzending.com, where you will be asked to login into your account and set-up the WooCommerce integration.
Enter credentials manually
It is also possible to connect your account manually, by entering the credentials in the input field and manually activating the WooCommerce integration in mijn.boekuwzending.com.
Connected to mijn.boekuwzending.com
You are successfully connected (live or test) when you see the following notice:

Testing
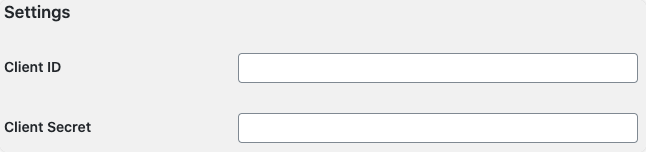
It is possible to test the plugin and your settings with the live credentials, labels that are not scanned will not be billed. If for some reason you would like to test the plugin in a separate test environment please contact us and we will look into the possibilities.
If you received test credentials you can activate the test mode by ticking "Enable test mode" and entering your test credentials.
Debugging
During integration (or when something is not working as expected) we recommend enabling the 'Debug Log'.

Once enabled the debug log can be found by clicking on View logs or through the menu
WooCommerce > Status > Logs and selecting the most recent 'boekuwzending-for-woocommerce-yyyy-mm-dd-HH-ii' entry from the dropdown and clicking on View

Shipping methods
With the plugin it is possible to enable two types of sending methods:
- Home / office delivery
- Delivery to a pick up point
WooCommerce has the option to create shipping zones and activate one or more shipping methods for these zones. More information about shipping zones within WooCommerce can be found here.
In this manual we assume that you have already set up one or more shipping zones.
Adding Delivery to a Shipping Zone
Follow the steps in order to add the delivery method to a shipping zone.
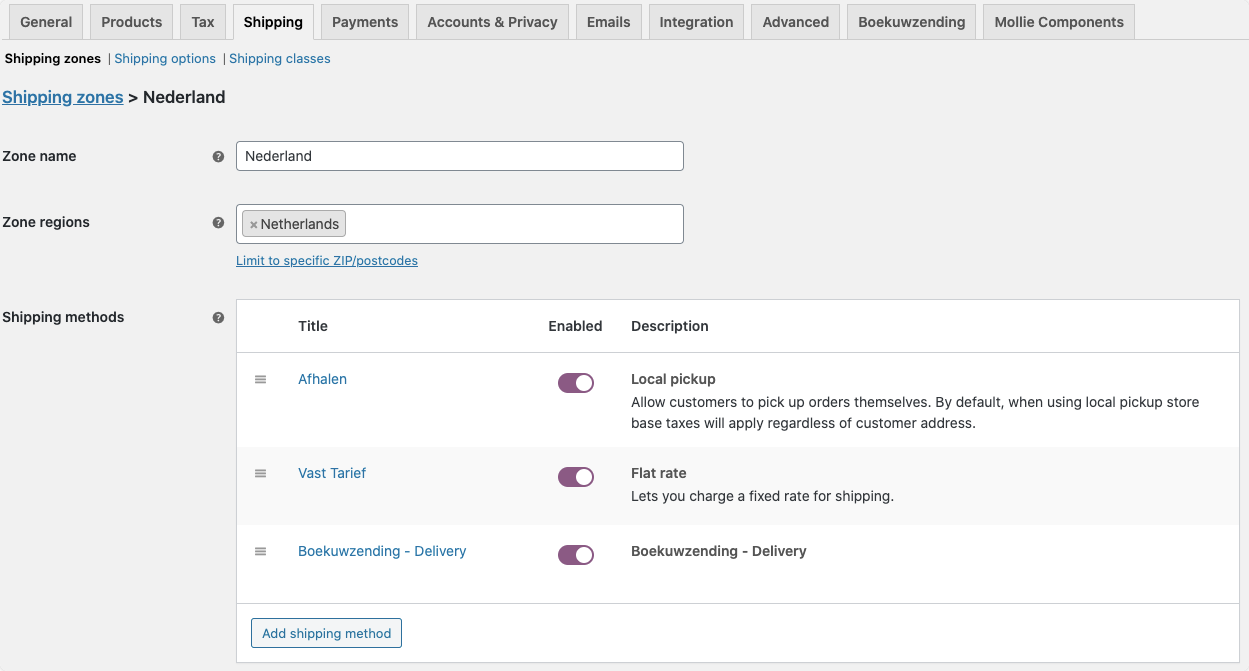
In WordPress, go to the WooCommerce > Settings > Shipping menu.
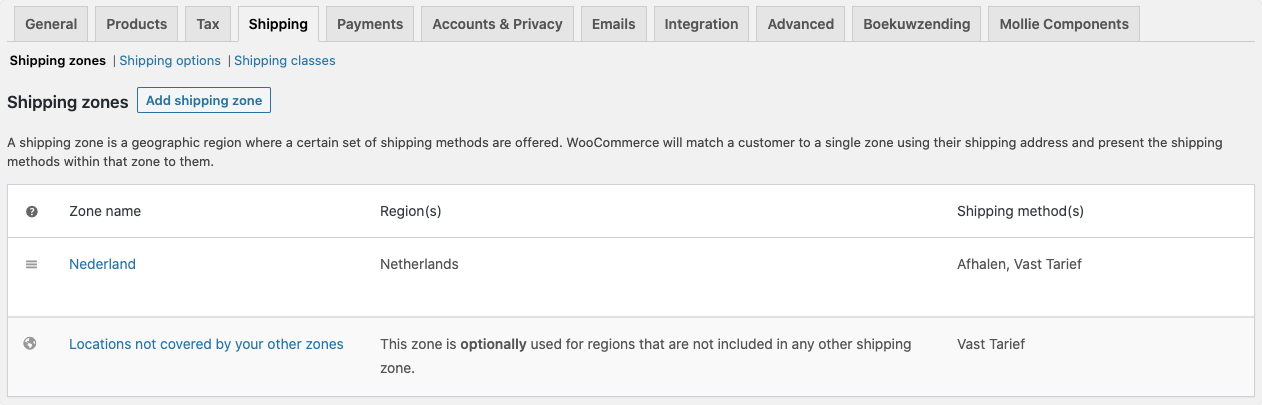
Click on the name of one of the zones.
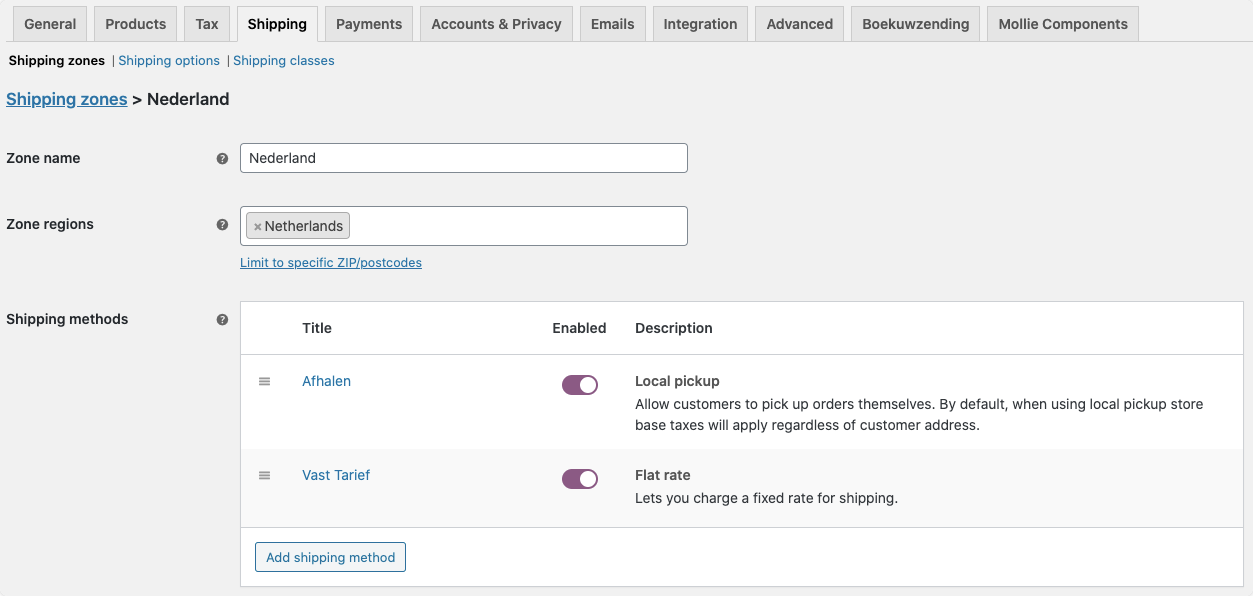
Clicking on Add shipping method will give you the option to add a new method.
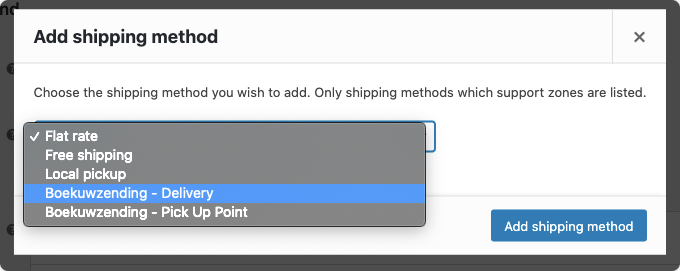
Select "Boekuwzending - Delivery" and click on Add shipping method.
Configuring the Delivery settings
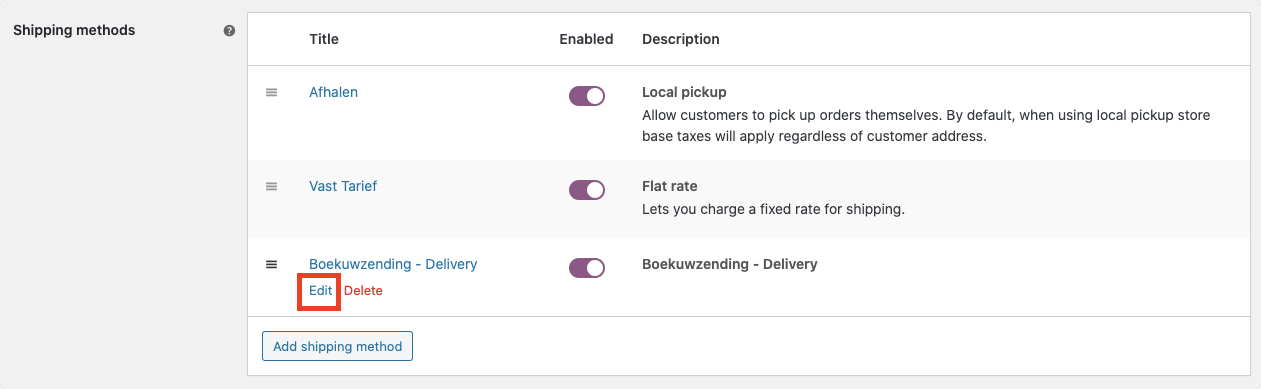
From the shipping zone edit page you can configure the specific settings for the "Boekuwzending - Delivery" method.
Hover the "Boekuwzending - Delivery" method and click on Edit.
The following screen will be displayed.
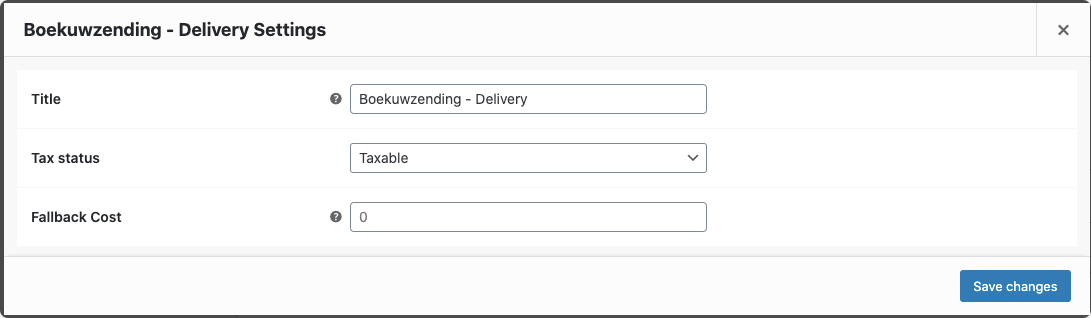
Title
Is not going to be showed to the customer because the plugin will show the names of specific shipping methods retrieved from the Boekuwzending API. You can edit the title for own references, but other than that it has no effect on what your customer will see during the checkout.
Tax Status
Indicate here whether VAT should be charged on the shipping methods.
Fallback Cost
If, for whatever reason, there is no connection with the Boekuwzending API to retrieve current rates, this price will be used.
When done click on Save Changes.
Adding Pick Up Point to a Shipping Zone
Follow the steps in order to add the pick up method to a shipping zone.
In WordPress, go to the WooCommerce > Settings > Shipping menu.
Click on the name of one of the zones.
Clicking on Add shipping method will give you the option to add a new method.
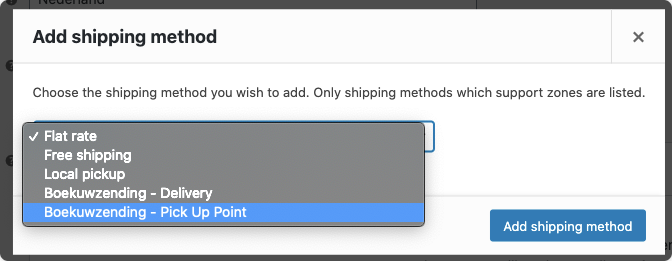
Select "Boekuwzending - Pick Up Point" and click on Add shipping method.
Configuring the Pick Up Point settings
From the shipping zone edit page you can configure the specific settings for the "Boekuwzending - Pick Up Point" method.
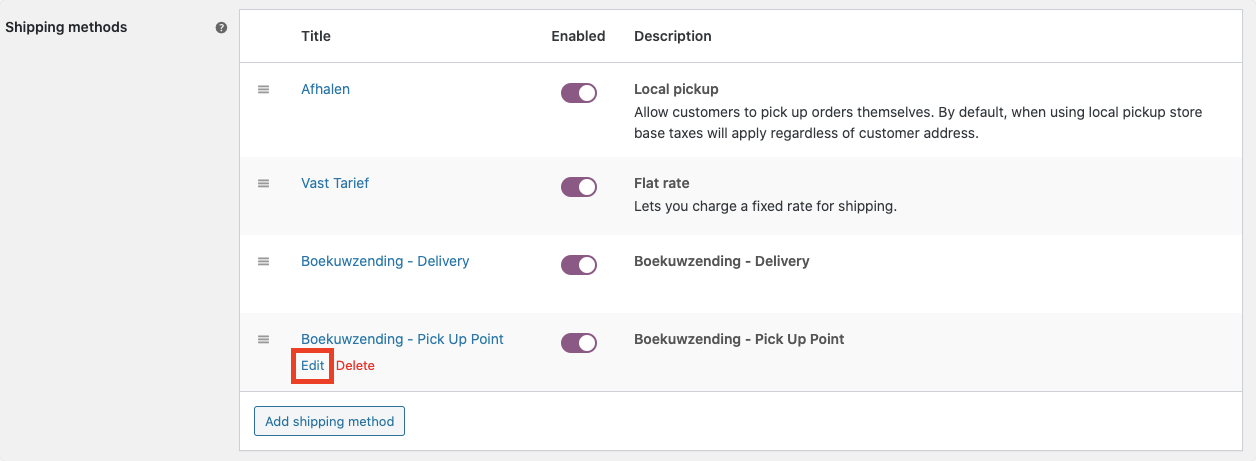
Hover the "Boekuwzending - Pick Up Point" method and click on Edit.
The following screen will be displayed.
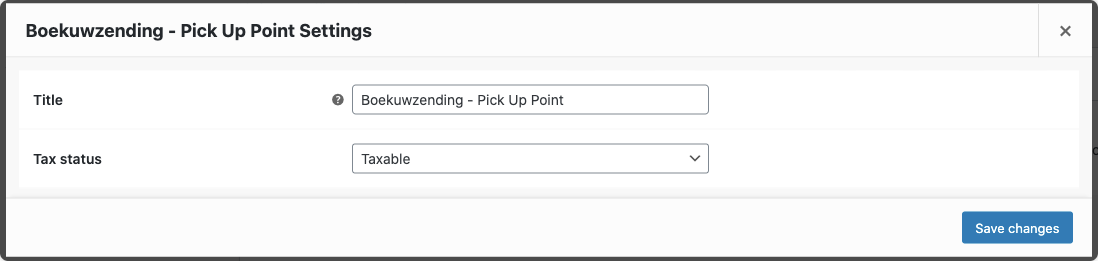
Title
Is not going to be showed to the customer because the plugin will show the names of specific shipping methods retrieved from the Boekuwzending API. You can edit the title for own references, but other than that it has no effect on what your customer will see during the checkout.
Tax Status
Indicate here whether VAT should be charged on the shipping methods.
When done click on Save Changes.
Usage
After installing, configuring the plugin and setting up the shipping methods, the Boekuwzending.com functionality will now be available in the order overview and order details.
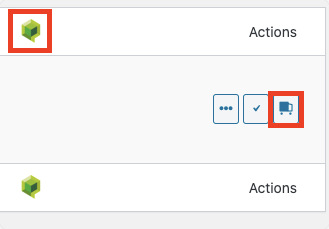
If you do not see the buttons of Boekuwzending.com, you can click on "Screen settings" in the top right corner and tick the "Actions" checkbox. If the screen settings have been adjusted, you will see the column with action buttons in the order overview.
Create a label for an order
Due to the fact the customer already chose the preferred shipping method during the checkout it is very easy to create a label for an order. You can create a label in the following two ways:
From the order overview, by clicking on the button with the "Truck icon"

Or, by opening the order details and click on the button Create Shipment.
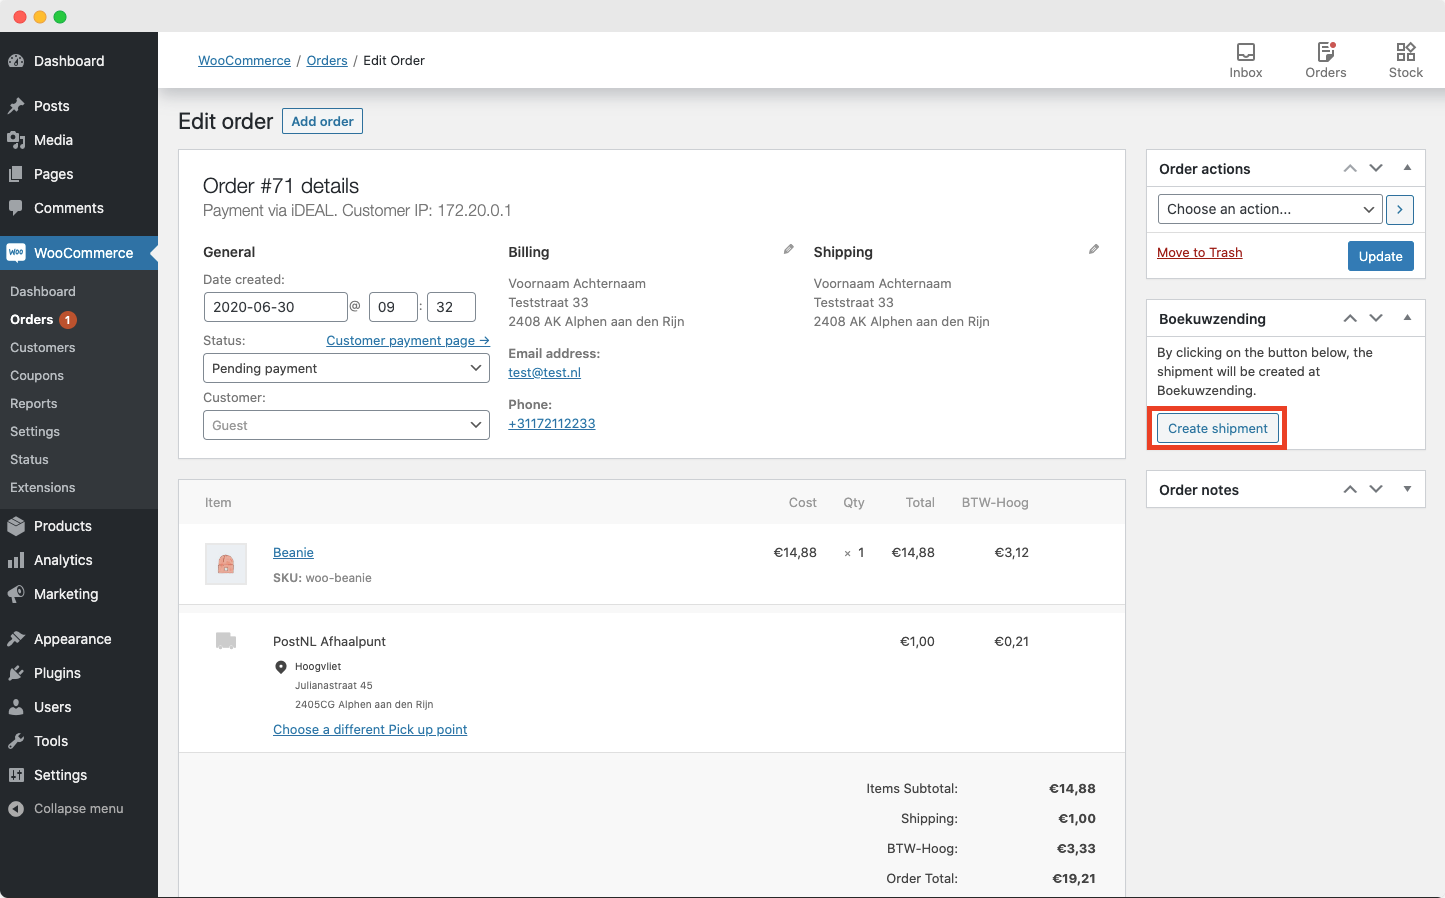
After clicking the button, the Boekuwzending metabox will show a loader icon while creating the shipment in your mijn.boekuwzending.com environment.
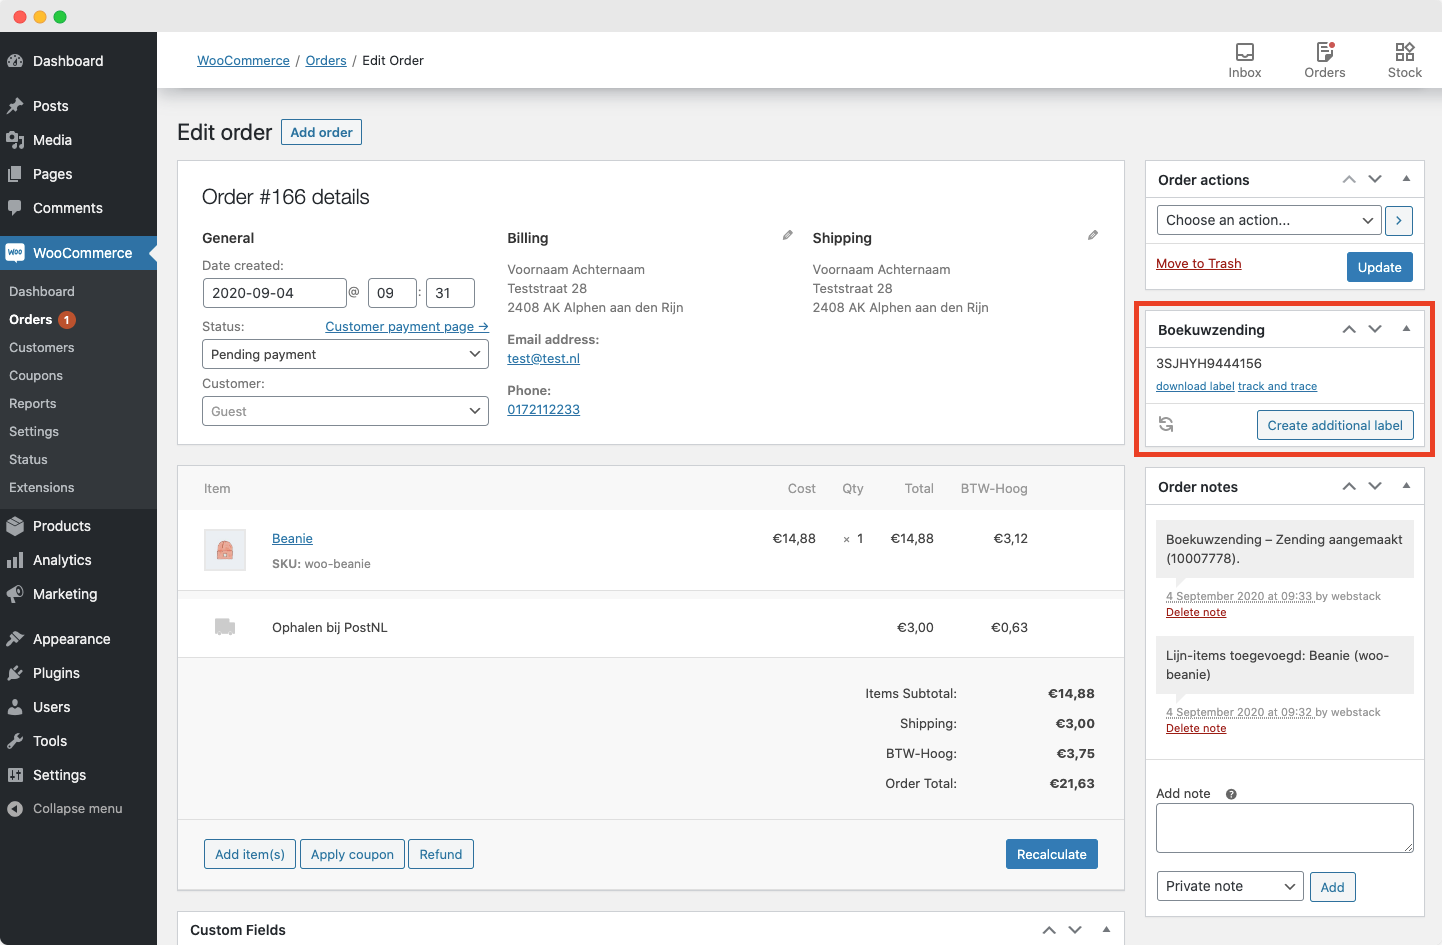
When the shipment is created, the metabox will show all available labels, their track and trace code and the most recent status.
Error Logging
All communication regarding shipment information will be added to the order notes prefixed with "Boekuwzending - ". When an error occurs while trying to sync an order, it'll also add an order not explaining what went wrong, along with logging an error in the debug log (when enabled).
Since version 2 of the plugin, a synchronization error will also result in an email being sent to the site admin, so they can investigate. This is opt-out, you can disable it in the plugin settings.
Create an additional label for an order
If the situation rises that you need an additional label in order to send the goods that were ordered, you can create one in the following two ways:
From the order overview, by clicking on the button with the "Label icon"

Or, by opening the order details and click on the button Create additional label.
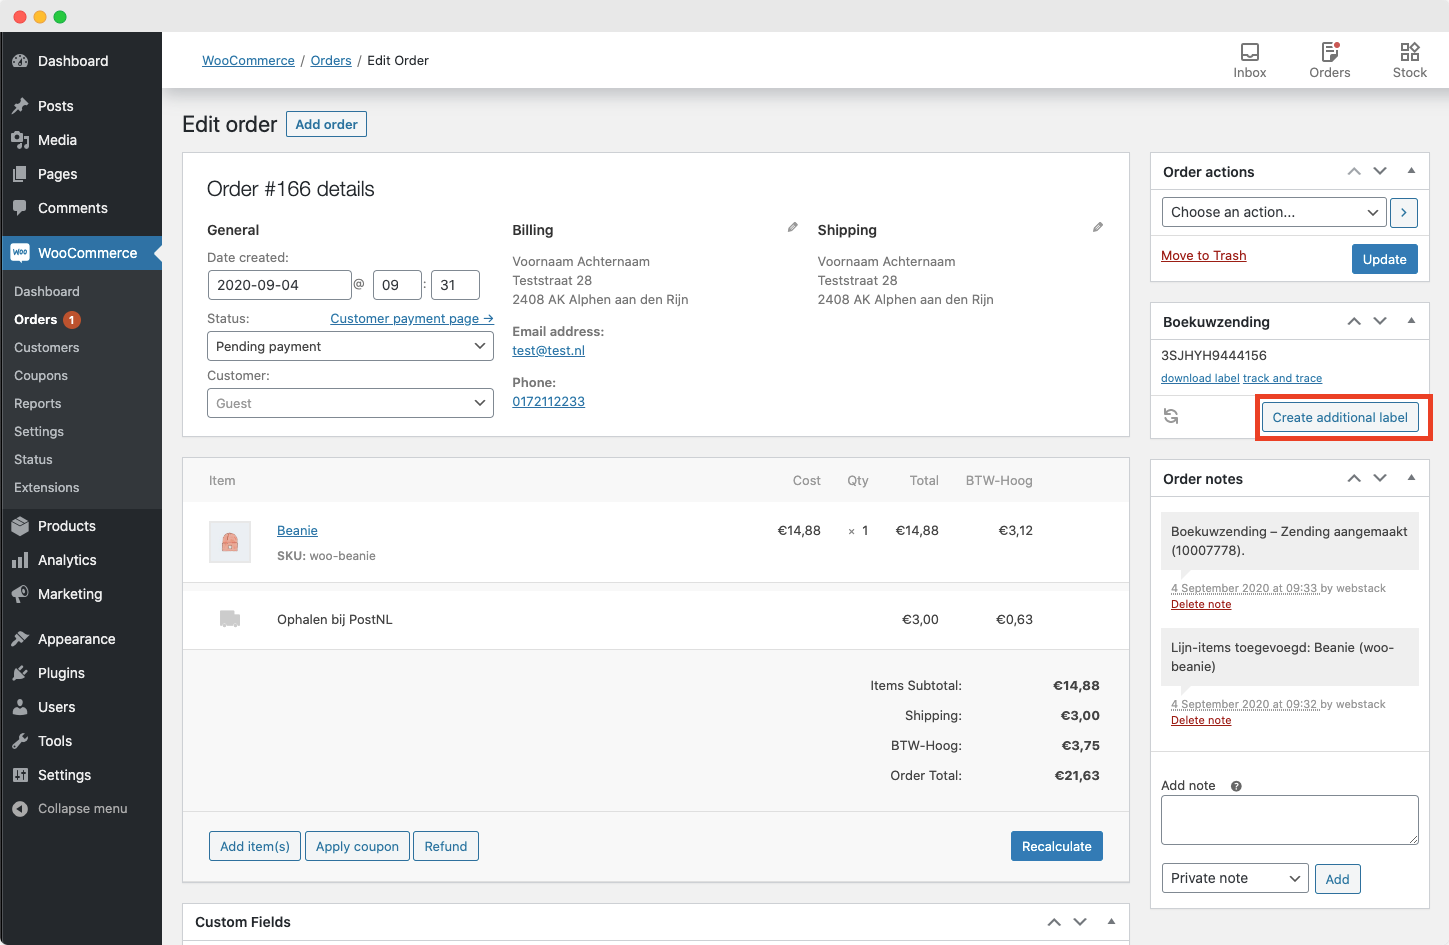
After clicking the button, the Boekuwzending metabox will show a loader icon while creating the additional label in your mijn.boekuwzending.com environment.
When the additional label is created, the metabox will show the new label, their track and trace code and the most recent status.
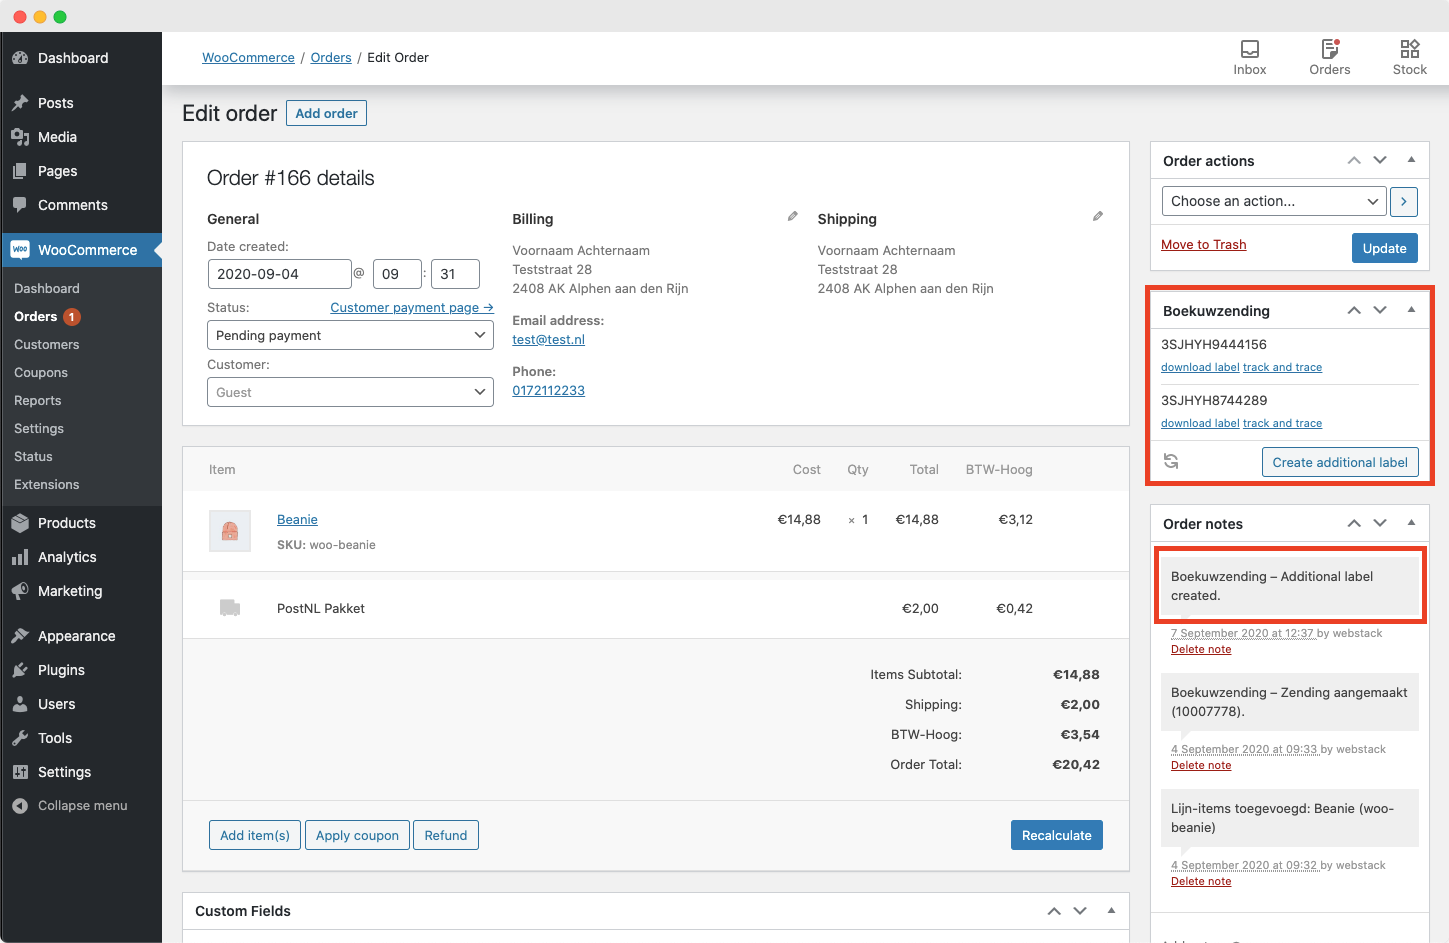
Downloading labels
There are two ways to download the created labels:
- From the order overview by clicking on the track and trace code in the Boekuwzending column.
- From the order details by clicking on the
download labellink in the Boekuwzending metabox.
Label Status Updates
Starting from version 2.0.4 of the plugin, the platform sends webhooks to your WooCommerce plugin, so it can mark orders as completed once a label has been created.
You can disable changing the order status by unchecking the checkbox, or change the status the order is moved to by changing the dropdown shown below:

Manually Retrieving Statuses
There are two ways to retrieve the status for the created labels:
- From the order overview using the button with the "Refresh icon".
- From the order details using the button with the "Refresh icon" in the Boekuwzending metabox.
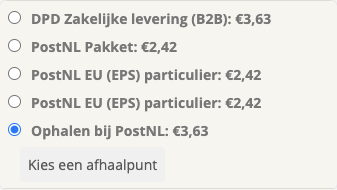
Checkout
As mentioned before the customer can choose one of the available shipping options during the checkout, the available options will be displayed following the standard lay-out which is present in the active WordPress theme.
Below you can see what the checkout looks like in a standard WooCommerce environment with the Storefront theme. If all address details are entered correctly, the options will become visible. Not all delivery options are available for all addresses and/or cart contents, this highly depends on the settings in the Boekuwzending Matrix.
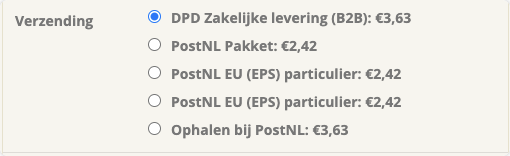
Only available pick up locations are shown. It is possible that a location unavailable due to crowds, so it will not be shown in the checkout.
Customizing the plugin
The plugin provides some filters to give developers the possibility to change the way certain parts of the plugin look or return data.
Customizing the pick-up point information in the order overview
add_filter('boekuwzending_template_order_overview_pick_up_point', function($templatePath) {
  ...add custom logic here
});
Customizing the shipping method information in the order details
add_filter('boekuwzending_template_information_before_order_itemmeta', function($templatePath) {
  ...add custom logic here
});
Customizing the pick-up point information during checkout
add_filter('boekuwzending_template_checkout_pick_up_point_information', function($templatePath) {
  ...add custom logic here
});
Customizing the pick-up point trigger
add_filter('boekuwzending_template_checkout_pick_up_point_trigger', function($templatePath) {
  ...add custom logic here
});
Change output for address line parsing
add_filter('boekuwzending_parse_address_lines', function($parsedAddress, $address) {
  ...add custom logic here
}, 10, 3);
Change the output for the order being posted to the Boekuwzending.com API
add_filter('boekuwzending_create_order', function($order, $wcOrder) {
  ...add custom logic here
}, 10, 3);
Change the output for the shipment being posted to the Boekuwzending.com API
add_filter('boekuwzending_create_shipment', function($shipment, $order) {
  ...add custom logic here
}, 10, 3);